by Mac Gardiner
![]()
Well, maybe not "mix" but at least the tools of one can metamorphose into the tools of the other, something like "swords into plowshares" as Boeing's Star Wars mirrors are becoming our telescopes. This, however, is on a much smaller scale. In this case, the bowling ball becomes the basis for a very solid and flexible camera mount that can compensate for the Earth's rotation for time exposures.
The point is that astrophotography cannot only directly support telescope viewing, but also supplement it in useful and entertaining ways. It provides a permanent and measurable record of what is seen on the telescope and also, used independently, can record what the telescope can't see, but our eyes (and binoculars) can see. For instance, the first celestial objects of interest to viewers are the constellations, each subtending from 15o to over 45o of the sky field. But our telescope, using a 35mm camera at prime focus, can only cover 0.62o at best! Even the small Cassegrain, at 500 mm FL, covers no more than 4o on 35mm film. None will see more than a fraction of a constellation.
 Astrophotography also poses the problem of time
exposures, required for all photography other than lunar, solar, etc. A standard
35 mm camera, with a F/3.5, 50 mm lens, requires 5 minutes for 400 ASA film
on a typical star field; with the earth rotating 1.25o and moving
the star image 1.26mm. Basically, for time exposures exceeding 1 minute
for a 50 mm lens, one needs earth rotation correction (and that drops down
to 10 seconds for a 300 mm lens).
One answer is to "piggyback" the camera on a dedicated telescope that has earth rotation compensation and a very solid mount. This is not always easy, inexpensive, or convenient to do, and some other solution is indicated.
So, I have come up with a very simple gadget. It will support almost any camera, allow it to point on anything south of the telescope dome, and correct for earth rotation for exposures of up to 40 minutes. The concept of the screw and inclined plane came from an old Sky & Telescope article, but the rest, a use of old ideas in combination, is mine. (ed note: the device is a combination of two ideas: a "barndoor" or "Scotch" mount with a ball-type mount.) This left me with severe concerns that it would work. As a result, I have held back on publication of this article until I had a chance to check it out with pictures of real stars. This has been done and it seems OK.
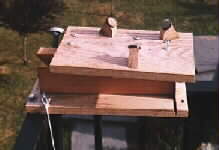
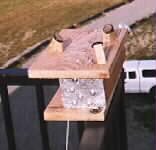
So, why a bowling ball? It provides a smooth operating "ball joint" that is all-weather, solid, heavy and the right size for this use. The picture above left shows the installation, attached permanently to the Ritchie Observatory roof railing. The ball was square notched to nest cameras or small refractors. Figure 2 shows one key element, the 1/2" 20 threads/inch rotation bolts while Figure 3 shows the scond key element, the steel flexible hinge. Together, they enable the upper plate to rotate 1/4o for each full turn of the bolt, with no slop, stiction or limberness around any other axis.
 Full image (24k)
 Full image (16k)
figure 2 figure 3
The support beam is cut at our latitude angle, and the system is oriented to north, ensuring that the rotation should approximate the Earth's rotation (up to 40 min.), no matter in what direction the optical system is pointed. (ed note: The bowling ball in place is shown in Figure 4, a simple schematic has not been digitized yet.)
figure 4
It is simple to use. First, one makes sure that the rotation bolt is reset so that the two halves of the support beam are nearly touching. Then, one simply rests the camera in the notch, and points the system to the desired orientation. Then one sets the camera on "time" or "bulb" and straps it to the notch with the Velcro straps that are provided. There is an aiming notch for final alignment. (ed note: the string prevents the ball from being inadvertantly dropped.)
Then one takes the picture. If the camera has a 50 mm lens (or shorter) one clicks it on, counts 1 minute and rotates the bolt 1 full turn (one side is flattened for orientation). this is done 4 or 5 times for standard film speed and F number, and then the camera is clicked off. If you use a 100 mm lens, turn the screw 1/2 turn every 30 seconds, or 1/4 turn every 15 seconds for a 200 mm lens, etc. If you are technically concerned , the table below covers the basic parameters.
| Lens Focal Length | FOV (degrees) | Rotation mm/min | Rotation /5 min |
| 38 | 43.5 | 0.2 | 1.0 |
| 50 | 35.8 | 0.3 | 1.3 |
| 200 | 10.2 | 0.9 | 4.4 |
| 3302 | 0.6 | 14.4 | 72.0 |
For example, with a 38mm lens on 35mm film, the angular coverage in width is 43.5o. With the earth rotating at 0.25o per minute, it will take roughly 3 hours for the scene to traverse the width. It will move 0.2 mm/min. With a minimum point source diameter of 0.2 mm, in one minute the point source will appear to be a 0.2 x 0.4 mm oval. In this case, one turn a minute should work out fine.
However, at 200mm, a spot size would be 0.2 x 0.9 mm (unacceptable), requiring rotation compensation at least once every 15 seconds. Our big telescope at 3302 mm obviously requires a continuous advance.
Caveats:
Now for some serendipity: It turns out that this unit supports binoculars very well. It has been shown that, if the binoculars are locked in orientation, one can see stars a full magnitude dimmer than if one holds them by hand. This is real handy on the 20 power models. Now you can spot a celestial object, show it to your friends, and keep it centered as the earth turns.
Also, small lightweight telescopes with limber tripods don't photograph well (or see well for that matter). If you rest the barrel in the "v" notch at right angles and velcro it down, you can improve the seeing significantly and do time exposure photography.
So why isn't everyone using this marvelous gadget? It only works for permanent locations where weight and bulk are a help rather than a hindrance. However, if you have a balcony railing or whatever that faces a view of the heavens, you can build one of these and use it for terrestrial or celestial observing and/or photography including time exposures.
Unlike Ed Ritchie, who would have built one of these overnight, far better than I could concieve, I had to make complete drawings and then beaver it out, using outmoded tools and arthritic hands. So I do have the drawings, along with five extra bowling balls (courtesy of a dear friend, Doris Brain, who has a neighbor who collects bowling balls).
If any member would like to build same, here is a deal. I will supply the drawings and bowling balls, if in turn you make one extra for the north railing of the observatory. Remember, when we start lining up to look through the new "big one" there is no better way to pass the time than by viewing and photographing the heavens, aided by a captive bowling ball!
(ed. note: the mount with a 9x60 finderscope attached)
Return to the home page of the
![]() Battle Point Astronomical Association.
Battle Point Astronomical Association.
![]() Return
to the top of this page.
Return
to the top of this page.